

To recover deleted files on Windows, stop using the affected storage location, check the Recycle Bin and verified backups, then scan the original device without writing new data to it. Save recovered photos, videos, audio, documents, and archives to another healthy drive. Fast action matters because editing, downloading, rendering, and synchronization can overwrite the space previously occupied by deleted creator files.
A creator project rarely lives in one file. Camera originals, voice recordings, scripts, thumbnails, graphics, project databases, exports, and licensing documents may be spread across a PC, portable drive, USB device, or memory card. A safe recovery plan begins by identifying exactly which version disappeared and where it was stored.
Quick Answer: Protect the Original Storage First
- Pause video editing, rendering, downloads, and cloud synchronization.
- Disconnect the affected USB drive or memory card when it is not being assessed.
- Do not format, initialize, repartition, or run CHKDSK before recovering needed data.
- Prepare a separate healthy destination with enough free space.
- Stop DIY attempts if the device clicks, overheats, disconnects repeatedly, or reports severe read errors.
Recovery extracts files to another location. Repair changes file-system structures, while formatting creates a new file system. These actions solve different problems. When the content matters, recovery and verification must come before repair or reuse.
Identify Which Creator Asset Is Actually Missing
Start with the production workflow rather than a blind scan. A low-resolution proxy is not the camera original, and a published social video is not always a substitute for the master export. Likewise, an editing project may contain only references to media stored elsewhere.
- Original photos or camera videos
- Imported media and editing proxies
- Voice-over, music, or interview recordings
- Scripts, captions, briefs, and release documents
- Thumbnails, graphics, fonts, and design assets
- Project files and autosave versions
- Final exports and compressed delivery archives
Search by date, file type, size, and likely folder, not only by filename. Cameras often use generic names, and editors may place cache files, proxies, and exports in separate locations. Check the application’s media panel for the last known path before assuming a file was deleted.
Check Existing Copies Before Recovery Software
Open the Windows Recycle Bin and sort by deletion date or file type. Then review OneDrive or another approved cloud recycle bin, version history, editing-app autosave folders, camera companion apps, external backups, network storage, email attachments, and copies held by collaborators. Pause synchronization if an empty local folder might overwrite a valid cloud version.
Microsoft explains that Windows File Recovery can attempt to recover deleted files from local internal, external, and USB storage when they are no longer in the Recycle Bin. It requires different source and destination drives and suits users comfortable with command-line syntax.
Match the Symptom to the Safest Next Step
- Recently deleted on the PC: check the Recycle Bin and stop activity on that partition.
- Missing after a transfer: inspect both source and destination before repeating the copy.
- USB drive or card looks empty: cancel format prompts and verify that Windows reports the expected capacity.
- File exists but will not open: preserve the original and distinguish corruption from deletion.
- Drive disconnects or makes unusual sounds: power it down and seek professional help.
If the loss occurred on the system SSD, ordinary Windows activity can create new files in the background. Minimize computer use. SSD TRIM can sharply reduce recovery prospects after deletion, so no software should promise a guaranteed result.
Prepare a Safe Recovery Workspace
Use another Windows computer when practical, or install recovery software on a healthy partition that did not contain the missing assets. Connect a separate destination drive. It should have enough space for all selected results and possible duplicates returned by a deeper scan.
For unstable or irreplaceable production media, repeated direct scans are risky. A qualified specialist may create an image first and work from that copy. Software cannot repair physical damage, recover fully overwritten data, or replace professional laboratory methods.
Recover Deleted Files with PandaOffice Drecov
PandaOffice Drecov is Windows data recovery software for PCs, USB drives, SD cards, memory cards, hard drives, SSDs, and external drives. It uses a read-only recovery mode and provides Quick Scan, Deep Scan, file filtering, preview, and recovery to a selected healthy destination. It can search for photos, videos, documents, emails, audio files, and archives.
Step 1: Open Drecov and Select the Original Location
Open Drecov and choose the PC partition, portable disk, USB device, or memory card that originally held the deleted files. Confirm the drive letter and capacity. Downloading or installing a program on the affected partition can overwrite recoverable space, so keep the application on a healthy location.
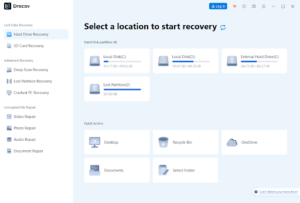
Step 2: Run Quick Scan First
Use Quick Scan for a recent deletion. Avoid editing, downloading, or transferring content while the scan runs. If the required assets do not appear and the source remains stable, use Deep Scan for a broader search.
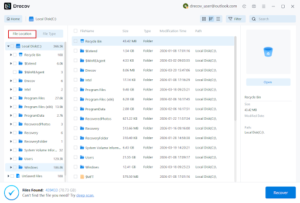
Step 3: Filter and Preview Creator Files
Filter by type, name, size, date, or discovered location. Preview supported photos, documents, and media before selection. A familiar filename is not enough to prove that a large or fragmented video survived intact.
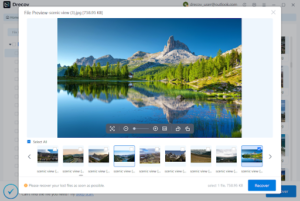
Step 4: Recover to Another Healthy Device
Recover selected files to the prepared destination, never to the source. If results are not in the expected output path, check the Drecov folder or Recovery folder.
Use the Right Device-Specific Guidance
For portable project drives and PC disks, follow a cautious hard drive recovery process and stop when physical warning signs appear.
A thumb drive used to hand off scripts, graphics, or exports needs a read-first USB data recovery workflow before any repair or formatting.
Camera and recorder media require memory card recovery guidance. Stop capturing new content immediately because it can overwrite deleted files.
Use the official Drecov Windows download on a healthy Windows location. Do not place the installer or recovered output on the affected source.
Avoid Common Recovery Mistakes
- Continuing to use the affected PC after deletion
- Installing software on the source partition
- Saving recovered files back to the source
- Formatting a card because Windows requests it
- Running CHKDSK before extracting important files
- Repeatedly scanning an unstable device
- Assuming a filename means the content is complete
Build a Creator Backup Routine
Keep at least three copies during active production: the working copy, a separate local backup, and an off-site or approved cloud copy. Do not erase a camera card until two verified copies exist. Use predictable folders for the project, date, device, originals, audio, graphics, and exports.
Save milestone versions of project files instead of replacing the only copy. Before publishing, open the archived export from a different location. Preserve licenses, release forms, fonts, and source assets with the final project so recovery does not restore media while leaving the production unusable.
Frequently Asked Questions
Can I recover deleted files after emptying the Recycle Bin?
Possibly, if Windows has not overwritten their storage space. Stop using the source and scan from a safe setup.
Why does a recovered video have the right name but fail to play?
The data may be fragmented, incomplete, corrupted, or partly overwritten. Verify the complete file before using it.
Where should recovered files be saved?
Use a separate healthy device. Writing to the source may overwrite other recoverable assets.
Conclusion
To recover deleted files for a creator project, stop all writes, identify the original storage location, and check built-in, cloud, and backup copies first. Drecov can scan stable Windows-connected storage and help filter, preview, and recover selected assets elsewhere. Verify every result before editing, and send unstable or physically damaged media to a specialist.